Tuesday, March 4, 2014

BAT MANtel

No I didn't spell that wrong, this entry is on a fireplace mantel for the Batdad Cave.  This was one of the toughest projects both from a time and a complexity level but it is also one of the most rewarding.  One of the things that makes it so difficult is finding the starting material.  I started with the trunk of a neighbor's apple tree that she had cut down.  The trunk was about 140 cm (~4.5 ft) long and had a diameter of 30 cm(~12 in).  I didn't get an official weight, but you can imagine how much it probably was and I can tell you it was a pain in the neck to move.  Here it is after we shaved off one side.
The Bat Mantel beginning to take shape.
Shaping the sides was done by cutting slits into the side of the wood with a chainsaw and then using a hammer and wedge to chisel off the remaining wood pieces as seen below.  For one side, I tried using the hammer to knock off the slits of wood that remained after the chainsaw.  This technique was quicker but it left a rougher surface that was harder to smooth down.  After the sides were roughly cut we smoothed them down by running the chainsaw diagonally over the top but not cutting into the wood.  it was done diagonally so the chain didn't get caught in any ruts from the initial cuts.  Despite this, we still knocked the chain off more than a few times.  Then I used a palm sander with rough and medium grit to get it to the finish I wanted.  I kept it a little rough because it seemed to go with the look of the mantel.   

The process for shaping the sides of the mantel


The BAT MANtel and Batkid
The Batkid helping on the BATMANtel
The Batjudge forming the BATMANtel
Men

Below is the piece cut down to its final form and ready for shellacing.
BATMANtel in raw form
I used a clear mid-gloss shellac (link here) and I loved the way it came out.  The apple had a darker inner core and the shellac really brought out the contrast.
Batjudge applying the first coat

BATMANtel without shellac

BATMANtel with shellac
After 3-4 coats of shellac the BATMANtel was complete but then the arguably tougher task of hanging it began.  As I mentioned before this thing is heavy.  The final dimensions were 14 x 24 x 130 cm (5.5" x 9.5" x 52") and I estimate about 30 kg (66 lbs).  And since the Batwife does not like her Batlings being crushed by awe-inspiring woodwork I had to ensure that it would stay on the wall.  

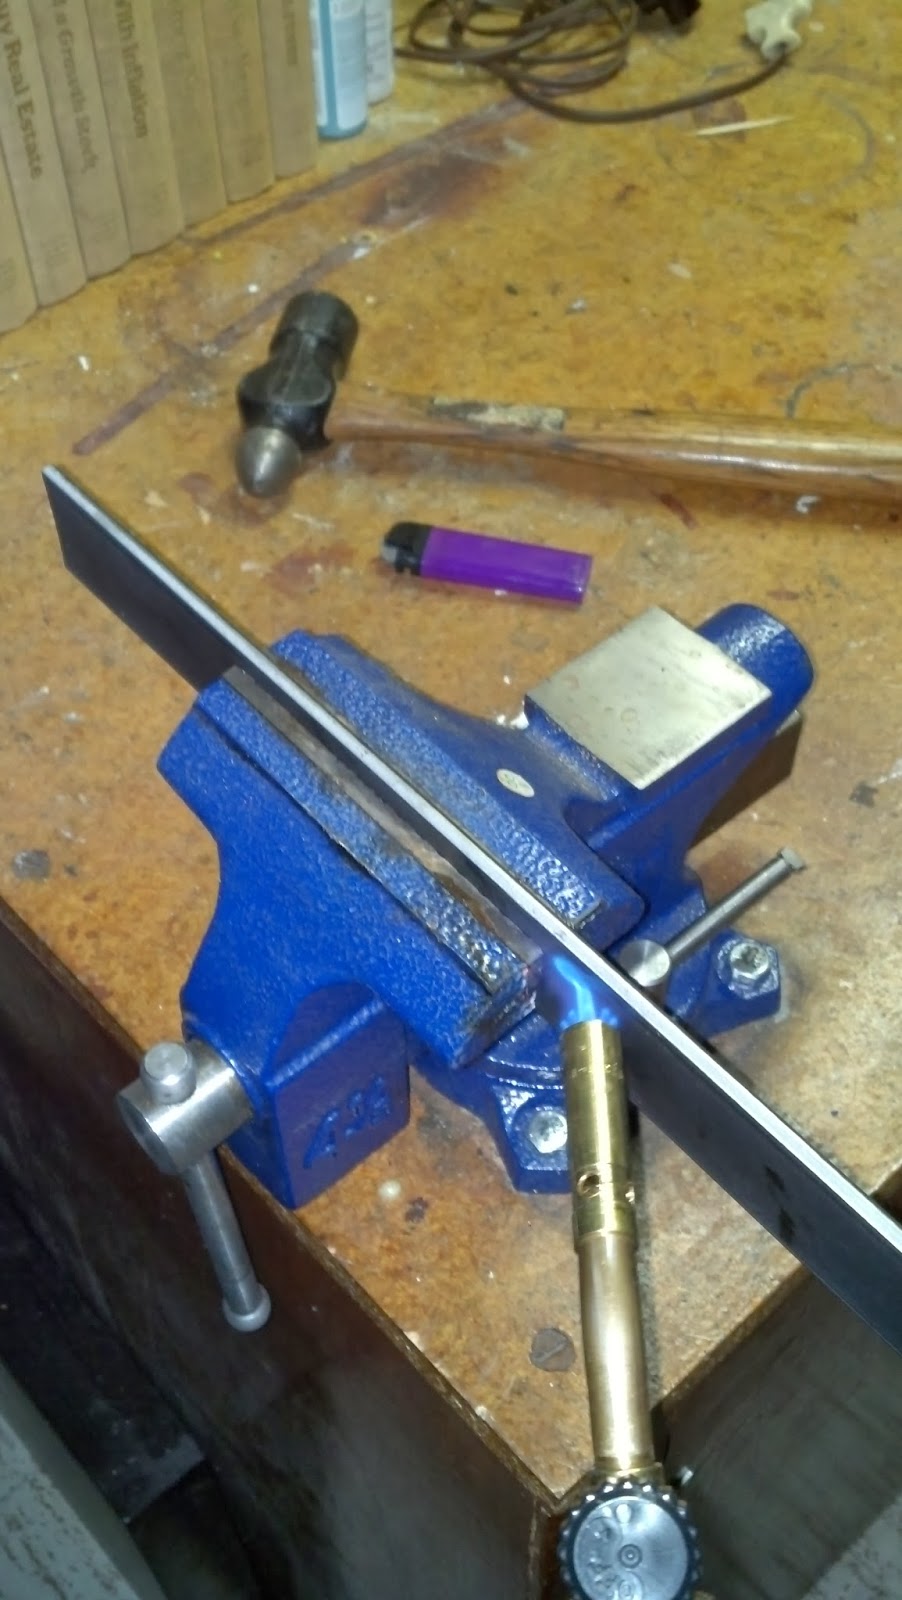
So that meant fire, steel, and making my own brackets.  I got two pieces of 3/8" steel strips from Home Depot.  I measured from a few centimeters above the BATMANtel, around the bottom, and then added about 2 cm to form a lip on the front.  Then I cut the length of steel I needed with a hacksaw and filed down the cut end.  Making two bends in the steel was tricky because I had to learn how to bend metal but the BatDad is intimidated by nothing.  I put the steel in a vise just about to the point of where I wanted the bend, leaving some space to allow for the bend.  The setup can be seen below.  

The beginnings of the bracket
I found that the hotter I got the metal the easier it was to bend and the sharper I could make the bend.  Also bending the steel by hitting it with the hammer also made a sharper bend than bending it by hand.  After letting the steel cool slowly, I drilled holes in the top of each breaking a bit along the way.  Then I connected the brackets to the wall using metal sleeve masonry anchors similar to these


Below shows some final pictures of the hung BATMANtel.  It held with 2 brackets but I went with 3 brackets to give it a good safety factor.  
BATMANtel front: one sleeve anchor at the top of each bracket.

BATMANtel left side

BATMANtel right side

BATMANtel front 2

Wednesday, October 23, 2013

Bat Plasma Mounting System

Whether you are keeping an eye on crime or just catching up on some Wonder Woman episodes on netflix, any good superhero needs a way to mount his/her many plasmas.  Here is a quick and easy way that may work for your situation.

The thing I like about this setup is it really just requires a strip of steel, some hardware, a drill and a hacksaw to accomplish.  Given that even a basic mount you can buy at Home Depot or Best Buy can run $20 to $80, this could save a lot of money and be easily customized for a given situation.  Here it is in action hanging above the Batbar.  If you look closely at the upper right corner of the bar you can see the batarang used to paint the Bat-tar.

The BatPlasma Mount holding up a 26" Vizio LCD


So basically I just bought a strip of 1-3/8" steel with holes and cut it in two strips with the trusty hacksaw.  The cut is not that crucial as long as it is not too long because any extra steel should be hidden behind the TV.  The holes that come in the strip seem to match up with mounting holes on the back of my Vizio and Samsung but you may want to measure your TVs before you buy the steel strip.  You could always get a solid strip and drill holes if you wanted but this requires an extra step.  Below is the back of the TV shown above.

The back of the mount, the connection to the back of the TV can be seen in the mirror.   

To attach the mount you need bolts for the TV (check your manual, usually M8 or M6 size), nuts/bolts for whatever you are attaching to, and a couple different sets of washers.  My bar setup was good because I had a horizontal beam I could drill through so it was fairly easy.  It is possible to hang it on vertical surface like on a wall.  I did this with my 42" TV shown below.

BatPlasma Mount hung on a vertical surface.
This setup is a little trickier for three reasons: 1) the mounts have to be attached securely to studs 2) the two mounts have to be hung perfectly level with each other and 3) attaching the TV is much more difficult.  In order to attach the TV first I had to attach the steel strips to the wall, bend them half way down, have a buddy (in my case, the Batwife) attach the TV while I held it out horizontally, then lower the TV down to vertical.  That's it!  Make sure you measure a lot before buying, drilling or cutting.  Soon you will have your BatCommand Center up and running.  

Saturday, December 1, 2012

Batcable Management

The Batdad Cable Manager
Today's post is a quick, easy, and cheap way to help organize cables around the ol' Batcave.  The Batdad uses only a single orange juice container to accomplish this amazing feat of modern technology.  I think I may have saw this many years ago and now I am subliminally copying it so if you invented this, all kudos go to you.  Buy the orange juice and pour it down the drain or you can drink it if you arent as rich as Master Wayne.  You could also use a milk or any other plastic container.  I like these containers because the plastic is a little more rigid than other alternatives.

The starting point.
 Next cut out a big flat area of the carton as shown below.

Cut out a large area of plastic.
 
Cut out piece and shape to your application.

Now you can clean it up and cut it specifically to the size and shape you want.  Punch as many holes as you need, I go with about 1 inch between holes but they could be closer.  That is what I like about this project is it is totally customizable.  As you can see below, I completely butchered one side because I was using one hole on a 3 hole punch to make the holes and I couldn't really tell how far apart they were.  A single hole punch would be much nicer.  I could probably afford one if I wasn't making secret entranceways and saving up for new Batmobiles but oh well.  It really doesn't matter because the other side will be hidden.  Next cut a small slit from the side to each hole to allow for cable attachment. 

Punch holes poorly, curse at self, turn around and punch holes properly.

Just screw or otherwise attach to the bottom of a table or workspace and there you have it!  I use mine for my home workstation, kind of like a poor man's docking station.  You could also use it behind entertainment centers or desktop PCs to keep things straight. Of course, once everything goes wireless this will all be obsolete, which is why I made this one of my first posts. 

The finished product attached to the underside of the Batbar.

View B with better lighting.


Friday, October 26, 2012

Fast, easy, simple display stand

So far, everything on the Batdad Cave (all two posts) has been rather involved and don't apply to everyone.  This one is fast, easy, essentially free and applicable to everyone.  This has probably been done in many other places but I haven't seen it, so if someone else did it first, kudos to them. 

The Batdad needs a way to display all his many awards from the citizens of the city, although a superhero does not do it for the glory. 

The Batdad display stand
Here is the list of supplies for this project: one strip of metal.  That's it.  A straightened paper clip works good for small items.  A larger piece, as long as it could be bent, could be used to display books, plaques, etc.  In this example, I used some scrap pieces I had from some fencing I used for the Batdog's fence. 

The entire tutorial is shown in the photo below.  First, straighten the piece of metal.  Second, bend the ends into small hooks in towards each other.  Third, bend the metal in half with the hooks facing up.  Finally, bend the whole assembly in half again to about a 30 degree angle.  You can adjust the stand to display your item more upright or more laid back.  The crucial step is the 2nd one, making the small hooks at the end.  The key is to bend them as tightly as possible around the thickness of the item to be displayed.  Needlenose pliers work best but if you are using a paperclip they can be bent by hand pretty easily.

Steps 1-4: Display stand


The finished project

Saturday, October 20, 2012

Bat-tar

No Batdad Cave would be complete without a guitar with which to melt some faces (as my friend Paul would say).  So my second post, which only took a few months to get done, is a sweet Bat-tar.   It all started with the Batdad's brother's old yamaha stratocaster knockoff.  It was looking and sounding pretty rough anyway so it was in need of an overhaul.  Here it is partially disassembled:

Bat-tar Before
Taking it apart is pretty easy.  I just pulled off the volume, tone, and pickup selector switch knobs and unscrew everything.  The screws around the pickups are a little longer and have a spring that, I think, isolates the pickups from the body of the guitar.  Then I washed and laid out all the pieces.  I am sure there is some product that washes and preps the pieces for painting better but soap and water did find for me.  Perfect is the enemy of good enough.  One thing I would do differently is set the pieces off the ground a little higher because I was getting some dust and bits of debris on some of the parts.  Here are the pieces laid out in my painting booth with the front plate painted:

Pieces laid out for painting
 One of my favorite effects (that my lovely Batwife taught me) is the glossy/matte effect.  First I painted the front and back plates of the guitar with high gloss paint.  Then I used a spare Bat-a-rang that I had lying around (thanks to my old buddy Matt) as a stencil.  Below is the back plate of the guitar with the aforementioned Bat-a-rang in position.  After a coat of matte black paint on all the pieces, the painting was essentially done. 

The back plate of the Bat-tar ready for a coat of matte paint
Assembling a freshly painted anything is one of the most fulfilling experiences I can do, especially when it is something as awe-inspiring as a Bat-tar.  The knobs came out great and the Bat-tar actually sounded better.  I guess I must have fixed a connection or something when I reassembled everything.

Bat-tar reassembled
The Bat logo and volume knob
Here is the before and after.  This was a fun, fairly easy project and great addition to the Batdad Cave.  Oh and the final cost was really just the cost of 2 cans of spray paint and a guitar or anything else you may want to Batify.
The final product

The before

Tuesday, July 24, 2012

Bookshelf doors


The inaugural post of Batdad Cave is also undoubtedly my greatest achievement in the Batdad Cave.  Dual functioning and super awesome bookshelf doors.  I came up with this idea almost as soon as we moved into the house but I wasn't sure how to actually execute the vision.  When one random day the family and I were walking through the local Ikea and a bookshelf happened to catch my eye.  I measured it and it was almost perfect I knew this project was destined to come to fruition.

The doors in the Batcave go from the main Bat living area to the back Bat workroom (don't worry, I'll stop saying Bat before things).  So it was a perfect place not only for the size and the shape of the doors but also because it is necessary for hiding the opulence of Wayne manor from the secret cool Bat workshop.  The doors were roughly 24"x80" so I had to find a fairly narrow bookshelf in order to make it work.  In every furniture store I went to I would be scouring the bookshelves to try and find one of close dimensions but most would be too wide or the wrong height.   Until that fateful day when the Swedish Gods answered my prayers.  The bookshelf in question was a 23.5"x16"x75" Besta shelf unit.  By that time, the dimensions 24"x80" were burned in my mind so I knew this unit would be a good candidate because they were almost the perfect width and the 5" space in the height would give me room to attach casters to the bottom.  So I immediately bought 2 units and could not wait to get back to try them out.

I went to Home Depot and cleaned out their 4" casters.  With the mounting bracket they were almost exactly 5" tall so they would make the total bookshelf with casters exactly 80" tall.   After I assembled the bookshelves I put the casters upside down on the bottom shelf to drill the holes leaving enough room around the edges for the casters to spin all the way around.  Then I attached the casters underneath with standard bolts.
 Bottom shelf with casters attached

Next I attached the hinges to the bookshelves.  I had a spare hinge from a bathroom remodel so I didn't have to take the hinges off the old doors.  This way, if I sell the house I can put the original doors back on but seriously, who is going to want regular doors when they can have secret doors.  Then I assembled the hinge, lined the bookshelf doors up, and attached the bookshelf. 

 Hinge attached to bookshelf

 Bookshelf doors 85% completion

As you can see it looked pretty good but there was a gap at the bottom that exposed the casters and the room behind the doors.  So my lovely assistant went back to the local Ikea and found "maple effect" scrap wood pieces in the as-is section for 3 bucks each.  They happened to be the exact width so I cut them to size and attached them with "L" brackets.

 The boards for the toe kicks

The toe kicks attached with "L" brackets...
 
...and here is the final product...

 ....Batman not included.  

So the whole projects cost:

Bookshelves (2 @ $85): $170
Casters (8 @ $13): $104
Nuts, bolts, washers: ~$10
Toe kick boards (2 @ $3): $6

Total: $290

Not bad to have total security and awesomeness for your house.  Next step, designing a locking system that is activated by a random pattern of piano keys...oh and buy a piano.